Amazon Web Services supports the creation of a network running on their infrastructure that is rich enough for separate public and private subnets just like you may have done in the past on your own internal network. The difference is that the machines, or EC2 instances, running in these Virtual Private Cloud subnets can also be situated in different data centers, or Availability Zones, in front of an Elastic Load Balancer that should be resilient to individual machine failures or even entire data centers failing. Very few companies hosting their own machines have that capability, and as a bonus this can be accomplished by developer.
Amazon provides a wizard for creating a network with separate public and private subnets, and steps to setup a load balancer for a network, however, to assemble a working combination of the two with multiple-availability zones can prove frustrating for those of us with limited experience with networks. In particular, ELB’s have their own idiosyncrasies and correctly connecting it with the other resources on the network has some pitfalls.
Basic Network Implementation

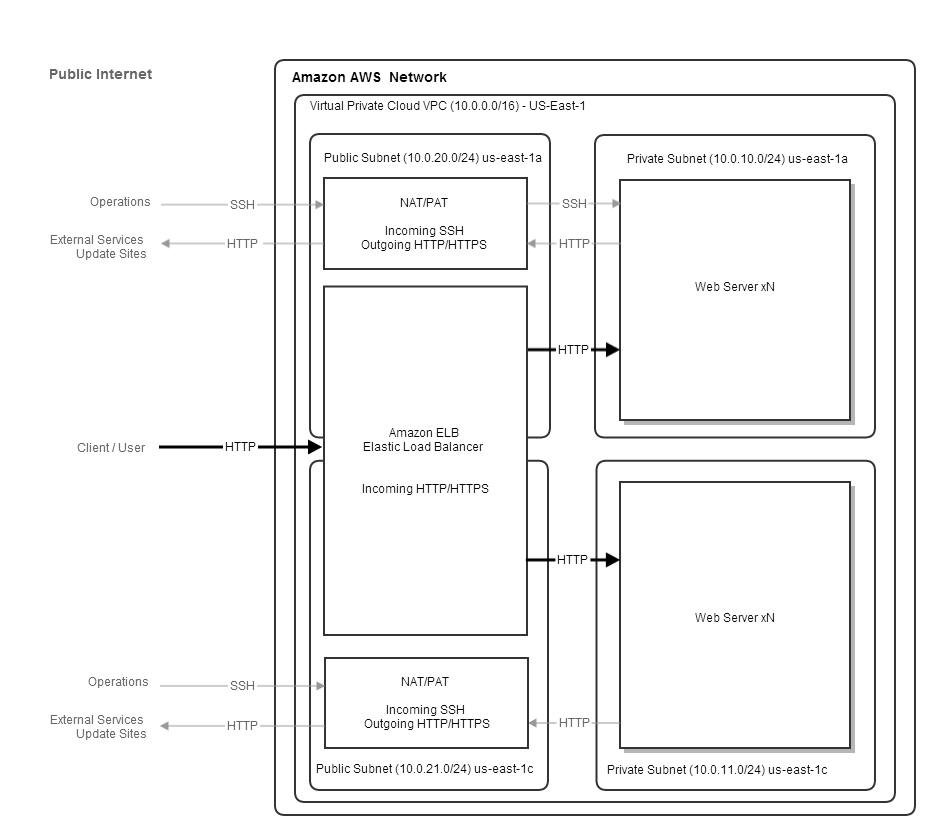
The illustrated network aims to provide a starting point to support scaling, with load balanced multiple web instances, that is resilient to machine and availability zone failures, while limiting direct access to the web instances.
A single Virtual Private Cloud situated in the us-east region,
comprised of a public/private subnet pair in the us-east-1a availability zone with a second public/private subnet pair in the
us-east-1c availability zone.
Web requests from users are received by an Elastic Load Balancer that forwards on traffic to healthy instances in
private us-east-1a and us-east-1c availability zones. The ELB is a custom network resource provided by AWS.
The Web instances are normal machine instances running a web server.
The Web Server instances are in a “private” subnet so they are not directly accessible from the public internet. Inbound HTTP traffic is handled by the ELB, however, we would still like to SSH into the machines for administration purposes, and for the web servers to be able to access external services, such as OS update sites or remote datastores. To accomplish this there is a NAT/PAT instance running in each availability zone’s public subnet that can route inbound SSH traffic through to the web instances in the sibling private subnet and outbound HTTP traffic from the web instance. The Nat/PAT is a normal machine instance with firewall settings for forwarding traffic.
Building Network with CloudFormation Template
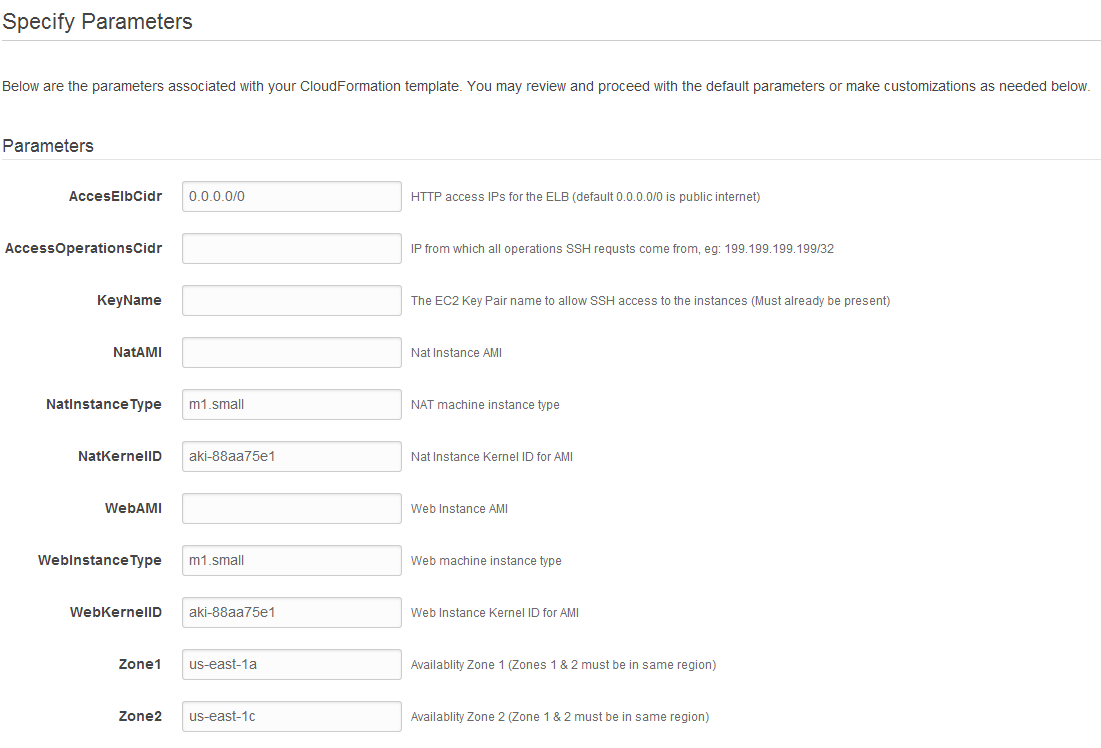
I have supplied a CloudFormation template that will create the network with all the resources. You will need to provide some configuration and supply the AMI’s for the NAT and web instances.
For getting started with the creating a network stack from a template see: http://docs.aws.amazon.com/gettingstarted/latest/wah-linux/getting-started-create-cf-stack-proc.html.
Use the CloudFormation Console’s “Create Stack” with the following template file: aws.template

- AccessElbCirdr limits the IPs of users sending HTTP requests to the ELB. The default
0.0.0.0/0lets anyone submit requests. If this is an “internal” application or you are still setting up your web system then you should set this to the IP that you access the web through (whatismyip.com) - AccessOperationsCidr limits the IPs that can SSH into the NAT and Web instances and should typically be the ip that you access the web through (whatismyip.com)
- KeyName should be a pre-existing EC2 Key Pair that you have set up for your EC2 account and is needed to SSH to the Nat and Web instances
- NatAMI is the machine image for the Nat instances
- WebAMI is the machine image for the Web instances and should start up a web browser on port 8080 at startup
It will take a few minutes for the Stack creation process to execute.

The EC2 Console should show the running Nat and Web instances in the two availability zones.

SSH Access to Instances
You should be able to SSH to the NAT instances, however, to access the Web instances in the private subnet willl require SSH port forwarding from the NAT instance to be configured.
In our case the Public IP of Nat1 has been generated as 54.236.248.151.
ssh -i my-key.pem ec2-user@54.236.248.151
sudo iptables -t nat -A PREROUTING -p tcp --dport 10016 -j DNAT --to-destination 10.0.0.16:22
sudo service iptables save
exit
You should then be able to access the Web 1 instance with private ip of 10.0.10.16
ssh -p 11186 my-key.pem ec2-user@54.236.250.86
For a complete /etc/sysconfig/iptables save file with all mappings for 10.0.10.0/24 and 10.0.11.0/24 see: iptables.
To access web instances on the second availability zone will require the Nat2 instance to be configured in a similar way. In our case the result would allow the Web 2 instance to be accessed with:
ssh -p 10016 my-key.pem ec2-user@54.236.248.151
Web Access with Elastic Load Balancer
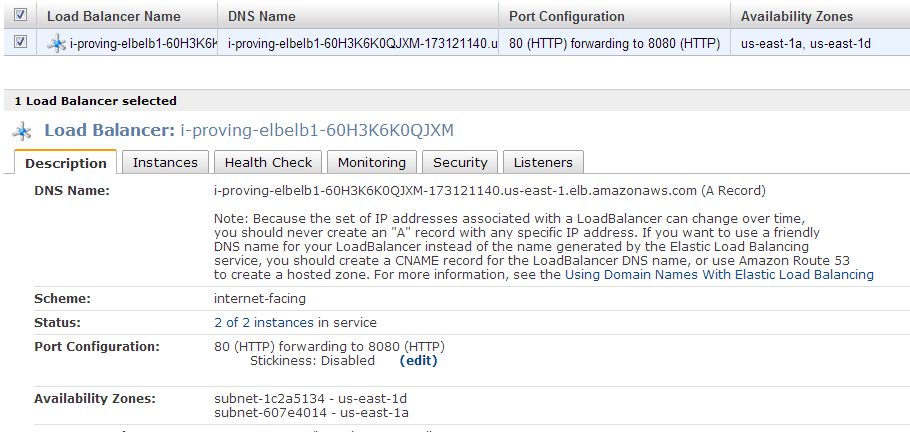
Assuming that your Web AMI is running a web service on port 8080 then the Load Balancer should have started up and the two web instances should be considered available:

If the status shows “0 of 2 instances in service” then the Web instances may not be responding on port 8080 to the health check.
In our case we could then hit our website on port 80 of the ELB to see our test page.
http://i-proving-elbelb1-60H3K6K0QJXM-173121140.us-east-1.elb.amazonaws.com
Next Steps
- Adding HTTPS/SSL inbound for the ELB requires the adding of a SSL certificate
- Save your NAT iptables configuration to a new AMI with the EC2 console’s “Create Image”
Originally posted on: [i-proving.com](http://i-proving.com/2014/01/14/aws-elastic-load-balancer-setup-for-vpc-with-multi-availability-zones/)